
 |
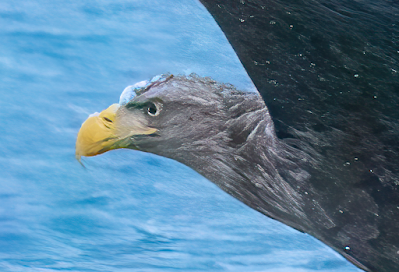
| Sony A9 III 1/80,000th of a second, outdoors on a bright day with wireless flash. |
 |
| Behind the Scenes shot of the above. Who needs a studio anymore? |
- Brief comparison between Adobe, DxO, and Topaz Noise Reduction tools
- Books in the Pipeline
- Seminars and Photo Safari!
- More Travel Photos
Adobe vs. Topaz Noise Reduction
After I published last month's blog (while still in Norway) showing the impressive noise reduction and image enhancement capabilities of the latest version of Photoshop, a longtime reader said: "There are much better noise reduction apps (i.e., DxO, Topaz Photo AI) than what Adobe provides now - and a lot faster than 15 minutes to process an image (probably less than 30 seconds) (*). Horrible light, high ISO - these tools can work wonders." Thinking this would make a great blog post, I sent him the original raw file and asked him to do his best using his favorite tools.
A few days later he wrote back: "Here is the Eagle image processed in DxO PL7 and Topaz Photo AI. I sent you both DNG and (95%) Jpegs. PL7 is a full-blown image editor but includes the Deep Prime noise reduction feature. (DxO also has a “Noise Reduction Only” app which doesn’t have any of the editing features that is less expensive.) If you are using Topaz or don’t want the editing features of PL7, the standard procedure is to pre-process the images and then output the DNG files for input to your editor of choice. (There are apparently a lot of LightRoom users who use DxO in that way.). I also cropped the image to eliminate the uneven top of the image. Both these apps run entirely on the Mac/PC - no internet processing - and only take a few seconds to process this image. Both apps are available for both Mac and Windows systems.
Topaz Photos AI is basically only doing noise reduction (emphasizing the “subject” (i.e., the eagle) and also sharpens the eagle. The one obvious issue here is that it gets the jpeg wrong - under-saturated. (Topaz lets you submit images to them to use in building their AI models, but this is your image and I didn’t do that. I generally don’t send my own images either but strangely, their noise reduction seems to be getting worse with each update - and I get an update every couple of days.) The key features of Topaz Photo AI that I like is that I get a full-screen preview of the noise reduction and sharpening and they have models for jpeg and tiff images too. DxO Deep Prime only works on raw images.)
For DxO PL7, I let the software apply the default set of adjustments, as follows. Deep Prime XD (the newest model), DxO Smart Lighting (it is supposed to improve the image dynamic range - I generally like the results), Selective Tone, DxO Clear View Plus (contrast, micro contrast), Lens softness correction (DxO has camera/lens specific modules and I had to download new modules for your camera), and Chromatic Aberration corrections. I think the DxO Deep Prime results are clearly superior to what Topaz produces. And I didn’t have to fiddle with the file at all to get these results (only cropping the image). My one irritation with DxO is that it only shows a small preview of the noise reduction results - you have to process and look at the output to really understand what happened."
Okay, that's a lot of embellishment. How did these tools compare to what I shared last month?
First, the original image for comparison (click on any image to view larger and sharper). Jpgs of the below processed shots (including the original .arw file so you can play with it yourself) can be downloaded and examined here.
 |
| Original .jpg out of the camera |
And here's what I was able to do with Adobe's new AI-based noise reduction:
 |
| This is a re-processed version of what I showed last month. I learned that if you're going to use this tool it's best to use it first before any other adjustments are made, even in Lightroom where the order of operations is theoretically unimportant |
Below is what my friend came up with:
 |
| DxO |
 |
| 100% crop |
 |
| Topaz De-Noise & Sharpen |
 |
| 100% crop |
 |
| 100% crop of Adobe (what I did) |
I know which one I like best. What do you think?
(Note: I'm just comparing the noise reduction capabilities here. Didn't have the time to do the curves and other adjustments for a true apples-to-apples comparison.)
*** UPDATE ***
Just a few hours after this blog post came out I got an email from Larry Powell, who downloaded my original RAW file and did his own take on it using Topaz tools. I have included his image in the .zip file linked to above, and a 100% crop of it appears below:
 |
| Topaz 100% crop from Larry Powell |
More Travel Photos
And speaking of Norway, I thought I'd share some additional travel photos taken since the last blog post.
 |
| Panorama of the Front of the Ship |
 |
| Downtown Bergen Daytime |
 |
| Philosophically I don't believe in candid or street photography; even though I recognize its legitimacy. I just think it's rude. Today I walked by a storefront in the morning (before the shops were opened) and I saw a man dressed like Robert Oppenheimer at a table reading the paper. I was tempted but ultimately didn't take the shot. That bugged me for the next hour (the shots that get away always do). So I returned to the store once it had opened and once the customers left I struck up a conversation with the shopkeeper of the smoke shop. I complimented him that he really looked the part. He explained that he's just an employee, and all employees either had to dress like this or wear a uniform. I asked if I could take an environmental portrait; he hesitated but eventually agreed. He even got his hat although he objected that they weren't usually worn indoors. We talked about travel. He always wanted to go to Boston but never had the time. I told him he's still young. I can't remember a time I got exactly the portrait I wanted in only three shots. But I did. And I emailed the image to him immediately. Instead of being a rude American by shooting a candid, today I made a friend. |
 |
| Bergen early in the morning. |
 |
 |
| Beregen through a rainy window. |

 |
| Being tourists amongst the fjords |
 |
| Being tourists amongst the fjords after removing the other tourists who didn't move for 15 minutes by using Photoshop's object selection / Generative Fill feature using the words, "Remove background". Although it's not perfect, it's 1000x better than the original. :-) |
 |
| Bergens Tidende is Norway's fifth-largest newspaper, and the country's largest newspaper outside Oslo. |
 |
| Alexei Navalny memorial |
Until next time...
Yours Truly, Gary Friedman
(*) To be fair, the 15 minutes I quoted to process the image in last month's blog had to do with the Guinnenss-book-of-world-records-slowest-internet-available-on-the-ship connection I had. Adobe uploads images to their cloud processors in order to do a better job with some of the new tools.
This blog post was written by a human. No generative AI was used in its creation (if you don't count the noise reduction in the eagle examples).


Before Topaz introduced Topaz AI they had 3 seperate plug-ins, Sharpen, Denoise, and Gigapixel. I found using these plug-ins deliver a much better result than AI. There is more individual control and the time to use whatever or all of the three is insignificant. Perhaps I am not using AI properly but so far I find AI to not be for me.
ReplyDeleteWhen I use Topaz I first set the exposure, background and foreground, if necessary. I do not change sharpness or contrast. I then use Topaz to denoise then sharpen. If the image needs further work such as blacks, white, color, saturation I return to Photoshop. I get better results than the eagle you published.
Thanks for the comparison of the products and their capabilities.
Thanks, Larry! I received your take on the eagle shot that you emailed me, and I've revised the blog post to include it. It makes the three tools look almost equivalent.
DeleteInteresting. Love the photos and the explanations. Best of luck in Kenya.
ReplyDeleteThanks!
DeleteQuestion about the post processing software. I have been using Topaz Sharpen AI and Denoise Ai for many years. Just started with the Adobe enhance.
ReplyDeleteHappy with enhance then Sharpen AI. Friends have suggested going to Photo AI - since Sharpen and Denoise AI are no longer supported/upgraded.
Topaz offered me 15% discount as long time customer. - So $170.00
You Eagle processed with Enhance seemed better than the Denoise plus Sharpen Ai version
Would appreciate you opinion of going to Photo AI
Thanks
Sonny
I think things are at a point where it doesn't matter what tool you use, as they all seem to do a respectable job and one is not clearly superior to another. See Larry Powell's image that I've just added to the blog post for a better comparison. (If you really want better quality, do what we did in the old days and come back when the light is better! :-) )
DeleteThanks to you and Larry I probably will spend the $170.00 elsewhere. Will keep working with Adobe Enhance (only for RAW or DNG)then Topaz Sharpen. If need denoising on tiff or jpeg use Denoise AI +/- Sharpen AI. Rarely need to upsize -when needed have used image size in photoshop - happy with it so no need for Gigapixel
ReplyDeleteI really like the "Beregen through a rainy window" shot!
ReplyDeleteAs a DxO and Topaz Photo AI user I was intrigued by this discussion. Comparing softwares is fraught, however, due to the myriad ways of processing an image.
ReplyDeleteStarting with the raw image, I got pretty much the same results in DxO using the default settings.
Your friend seems to have used Topaz to process the raw image, applied defaults, then converted it to jpeg. I tried that and got the same poor results that he did. But Topaz doesn't render raw images well, in my opinion. Its forte is subject selection, sharpening, and denoising. So I first convert the raw to dng in DxO, then process it in Topaz AI. The Topaz "auto pilot" results using this method are, in my experience, very good. For this image I tweaked the strength of the sharpening a bit (easy to do, as your friend says, as you get full-screen real time updates) and finally converted to jpeg. The final result, to my eye at least, is better than the Adobe or DxO. So I’ll continue with this approach, although the differences aren’t huge.
Thanks, Phil! Due to the great interest in this topic I've set up a Google Photos album where everyone can contribute their own takes on this image. Label them with your name and the tool you used so we can all compare!!
ReplyDeletehttps://photos.app.goo.gl/kKwZRjtWQU4bPFuD6
Like other readers here, I took up the challenge of reprocessing Gary's Eagle image, just for the fun of it. I blindly applied the Adobe NR option in LR (which I'd never used before) to Gary's raw image and got essentially the identical result he had posted earlier in his blog. I then used Topaz SharpenAI to apply a bit of sharpening to the Adobe NR processed image. I also own PhotoAI but rarely use it because IMO it is much too aggressive in its processing. Considering how noisy Gary's original raw image is, the final sharpened image looks to be quite decent despite a lack of fine detail.
ReplyDeleteGary has uploaded both of my images to his Google Photos album and asked me to post this comment in the blog. NB: there are some sharpening artifacts in the water in the foreground of the Topaz sharpened image, which I did not bother masking out in SharpenAI as they are not relevant here.
Another excellent blog Gary; much food for thought
ReplyDeleteGreat tech insights, as usual. I use both Topaz photo and video AI. Mostly the video app for upscaling 1980s and 1990s digital video. In DaVinci Resolve, I can replace the original AVI project video with Topaz's upscaled video, and Davinci Resolve retains all the original edits. Now that's slick!
ReplyDeleteHappy to know you're doing seminars again.
Gary, I have the Sony A9iii and I have a question I am hoping you can answer. I want to buy a flash that will take advantage of the high shutter speeds, and you said only two Sony flashes can currently do that. I am on a budget, so I want to start with the cheaper option and add the more expensive as my budget allows. The cheaper of the two that my mentioned is the HVL-F46RM. There is a newer version of the flash (HVL-F46RMA GN46) which costs about $200 more than the original version. Do I need to get the newer version of this flash or is the older one compatible as well? The new model does mention the ability to shoot at 1/80,000 in its specs, but the older version does not mention that ability. I am fine spending more if needed, but would prefer to spend less if I can. Thanks for your insight!
ReplyDeleteIt is my understanding that Sony had a hard time sourcing certain parts for the F46RM and so re-designed it internally in the form of the F46RMA. They should function identically and in theory nobody should be able to tell them apart based on performance. So either version of the F46RM will work for you.
DeleteThank you so much for taking the time to reply! I have just placed my order and can't wait to try it out!
Delete