- Monster Adapter Update
- A Virtual Zoom Lecture for your Photo Club
- In the Pipeline
Topaz AI - As Good as They Claim?
[Editor's note: This is an expanded version of an article which appeared in a recent edition of Cameracraft magazine.]
AI has been the buzzword in the technology industry for the last 30 years. But when Topaz used it as a branding for their latest collection of image enhancement tools, the phrase they should have used is “deep learning”; a technique in which a learning algorithm is trained with thousands of before & after images to allow the computer to slowly learn what a good cleanup looks like. Most people who have spent years learning how to do these things by hand in Lightroom and Photoshop may not think these new tools are anything special; for they can’t possibly improve upon a skilled retoucher. I thought I would spend a few days testing that theory.
The data set I used were my images from my 2003 – 2004 tripto teach English in China, taken with the state-of-the-art 5 megapixel Minolta
Dimage A1 camera. At ISO 100 the image
quality was wonderful; higher than that not so much. I shot digital instead of film because I was
broke and couldn’t afford the film and processing; I also didn’t have a large
hard drive on my laptop so I had to shoot .jpg only for my six-month trip. Time has added historic value to these images
and so I thought I’d see what modern technology can do to clean them up. My main goal here was clean up my entire
China photo library without having to tweak every image by hand (which would
have taken forever).
Topaz offers many different tools; for this test I
will use three: 1) Topaz DeNoise AI,
which promises to clean up noise like a pro; 2) Topaz JPEG to RAW AI which
claims to be able to get rid of .jpg compression artifacts AND expand the
dynamic range of a .jpg (!), and 3) Topaz Gigapixel AI, which claims to be able
to up-res an image better than Photoshop’s bicubic resampling algorithm. (Topaz has other tools as well… see
topazlabs.com ).
Step 1: DeNoise AI
The DeNoise program (like all of the other Topaz programs evaluated here) has a simple user interface with remarkably few controls. It offers two noise cancelling algorithms
called “DeNoise AI” and “AI Clear”. I
tried both – AI Clear seems to emphasize smoothing over noise (while sharpening
fine detail); while Denoise AI seems to reduce the noise 10% but still leaves
lots of detail for the purists. It’s
the old noise vs. detail tradeoff. While
I vastly preferred the results of the AI Clear algorithm, I found that when
left on AUTO it tended to oversmooth skin and make things look somewhat plastic-y.
 |
| Original |
 |
| Denoised by Topaz |
Putting it on Manual gives you a small set of controls: Remove Noise (Low – Med – Hi), Enhance Sharpness (Low – Hi), and a Recover Details slider. I found that settings of Medium, Low, and 25% provided good noise reduction without going overboard on smoothing.
 |
| Baoting Train - original |
 |
| After denoising |
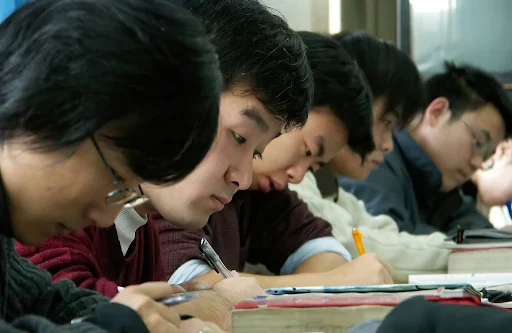
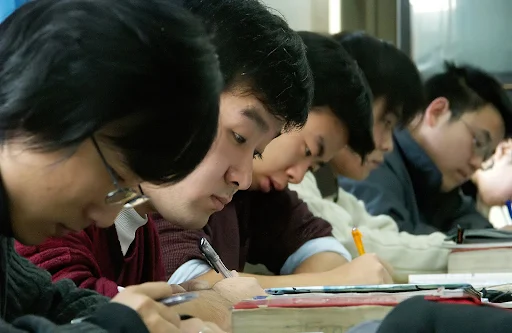
Below is a good comparison between the original, Denoise AI Clear, Denoise AI, and sharpening by hand via Photoshop:
 |
| 5 Heads Studying - Original |
 |
| AI Clear. |
 |
| Denoise AI |
 |
| Hand-denoised in Photoshop |
 |
| 100% crop showing original vs. AI Clear. Topaz took the liberty of sharpening the eyelashes too.) |
I must say I like my Photoshopped image slighty better, but it took about 3 minutes to play with the sliders to make it look the way I wanted. Let’s try it with a more difficult image.
 |
| Dancers with Fans - Original. Pretty gosh darned noisy. |
 |
| AI Clear |
 |
| Denoise AI |
 |
| Hand-denoised in Photoshop |
And here are some 100% crops:
 |
| Original (left), and AI Clear (right) |
 |
| Denoised by Photoshop |
Once again, Photoshop wins. This time by a lot.
Here’s an image in which the
Topaz actually did a slightly better job:
 |
| Headache on Phone - Original |
 |
| AI Clear |
 |
| Denoise AI |
 |
| Photoshop |
Just as no single RAW conversion program does the best job on all types of images, so too will no single noise reduction tool do the best in all examples. But the overall winner here is Photoshop in the hands of a knowledgeable retoucher.
Step 2: JPEG to RAW (!)
The next program is Topaz’
too-good-to-be-true-sounding JPG to RAW converter, which promises to get rid of
.jpg compression artifacts AND expand the dynamic range of a .jpg so you can
recover highlights that you thought were blown out. That sounds
impossible, but their marketing material points out that with machine learning,
the old rules don’t apply and now anything is possible. Let's see if that reasoning has merit.
Here’s the image I started
with (an image already denoised via the AI Clear algorithm):
 |
| Original - Already de-noised via AI Clear |
 |
| Converted to .dng - can Topaz make the .jpg compression artifacts go away? |
First let’s look at how it can reduce .jpg compression artifacts. There’s no Photoshop comparison here, as getting rid of .jpg compression artifacts is something Photoshop can’t do. I don’t even know how one would go about algorithmically un-doing JPEG compression artifacts.
 |
| Original (left) and converted to .dng (right) |
 |
| It's worse. |
Something else about the JPEG to RAW program you need to know: Not only does it convert the format from .jpg to .dng, but it also converts the color space from sRGB to ProPhoto. Important to know if you plan on doing a batch process on the .dng files immediately after the conversion. Don’t do it – you’ll end up with images whose color balance looks off:
Here’s an acid test for .jpg compression artifact removal. I’ll use an image from an even earlier digital camera which appeared in one of my most-read blog posts ever, “Where the Anti-JPG bias came from” (https://bit.ly/38UK2yK (and its sequel, https://bit.ly/38RUW8h)):
 |
| Original |
 |
| Converted to RAW |
To attempt to get optimal results, I adjusted the image with
the program in Manual mode with the Reduce JPEG artifacts slider all the way to
the right; viewed at 200%:
 |
| Original (left). Converted to DNG (right). |
Not impressed. On the other hand, I don’t think I had any right to expect even this level of improvement.
What about the claim of increased
dynamic range? Let me use this image
that appeared in an earlier issue of Cameracraft, which was shot in .jpg only
(what was I thinking?) and the sky kind of blew out:
 |
| Original (left) and converted to DNG (right). Yes, a slight improvement. |
Step 3: Gigapixel AI
The last program to be tested
is Topaz Gigapixel AI, designed to upsample images. And really, the only proper way to evaluate
this is to blow up the original and up-res’d image to poster size and view them
from a reasonable distance. 100% crops
on an A4 magazine page won’t tell you anything meaningful.
But I can summarize the results for you: At 2x, it did about the same as what Photoshop could do. At 4x, Topaz did a little bit better.
 |
| 4x upsizing via Photoshop |
 |
| 4x upsizing via Topaz |
Topaz could go as high as 6x
but that’s just an unreasonable thing to ask.
It’s like asking the new Samsung Galaxy S20 Ultra phone to actually zoom
in to 100x. It’s not a useful
capability.
Conclusion
So far, the differences between
the Topaz and Photoshop versions of these test images are so nuanced that you
really have to pixel peep to see them.
In my mind that means that the differences are not that meaningful.
BUT - here is the big thing that
the Topaz tools have going for them – there are designed for people who don't want to spend half their lives learning Photoshop, but want to get Photoshop-like
output with a minimum of effort. The
user interface is incredibly simple and straightforward, usually having only
one or two sliders plus one or two buttons to press. That’s it.
After having played with these tools for a few days, I bit the bullet and used these tools to perform a mass batch denoise-and-upscaling on all of my China .jpgs Photoshop might have been a little better if you pixel peeped, but Topaz did the whole batch in minutes whereas Photoshop would have taken me a couple of days. How much more time do I want to spend in front of my computer?
Bonus!! Topaz can up-res video too!
20 years ago I flew myself to Hawaii to make this Xaphoon "How it's Made / How to Play" video, showing how the inventor chops down the bamboo from the forests of Hawaii and concert-tunes each instrument just by eyeballing it. So to test Topaz' Video Enhance AI program, I up-res'd a small clip from that video - the part where he tunes it by eye without measuring anything. (Remember, all of the bamboo dimensions are different! How much genius do you have to have to just eyeball it and say, "D should go HERE!"?)
So below are links to three different versions of that clip: The original SD version, plus an HD and 4K version which were up-res'd by Topaz' Video Enhance AI program. Aside from some small artifacts (which I think are related to a de-interlacing function I neglected to do), the results are quite impressive, and way better than what I was expecting!
Original SD version: https://youtu.be/RfWW_JSJFWQ
HD version: https://youtu.be/KJJhWzWwzkw
4K version (!): https://youtu.be/4awc11nCD3o
 |
| Original SD video (left); enhanced to HD (right). Impressive! |
In The Pipeline
Fujifilm X-T4 is being released in stages; Release 1 is now available.
The Friedman Archives Guide to Sony's ZV-1 is now out and available in all formats!
Olympus E-M1 III is being worked on by Tony Phillips. It can be pre-ordered at a discount here.
Sony A7S III can be pre-ordered at a discount here.
Monster Adapter Update


Video Enhance AI is very impressive, but you really need a high end (and expensive) video card for it to be practical. It can take hours to process just a few minutes of video on a typical home computer.
ReplyDeleteIf you're not in a rush you can just let it run all night (or several nights) while you get some much-needed sleep. That's what I did. But if I were a videographer I'd definitely invest in a high-end card.
DeleteGary, this is a great comparison and it confirms my much less informed opinion as derived from my own scenarios. I've found myself using DeNoise more often than PS and or LR for this task (my use is at a 80/20% split, with the latter being more critical or nuanced images). I also like Topaz Sharpen AI, in particular for bird photography. Per your findings, I need to try out their video tools and get the old videos out! More broadly, their tools are not without flaws, but I credit Topaz for being at the front of bringing the "smartphone app" intelligent and easy workflow to the desktop or laptop masses. That's (at least to me) important; simplicity being one, and maybe modern speed of delivery to client or family being another. Thanks for always providing a great resource for all of us. -- Regards
ReplyDeletePixelmator Pro also offers a number of ML (Machine Learning) functions. I used the software to upscale my Antartica vacation images shot with a Kodak DC-4800 camera (3 mPix!). I wouldn’t have bothered but photo book software doesn’t like small images. The upscaling worked very well I thought.
ReplyDeleteThere are other ML functions available, including noise reduction and overall image “enhancement”. I have been less impressed with these functions - they seem to be too aggressive.
Of course, the ML features should improve over time as the models get more training data. I used to have a small program called PhotoLemur that did ML auto enhancement - it failed most of the time. I sent their support some examples of the failures and they (apparently) used them because the next release didn’t have the same problems.
David Redfearn
Thank you David. PP has been on my machine for a bit and I always fail to give it a fair run. I need to rethink that. Thanks!
DeleteGary I shared your blog post with my Photoshop study group, which has an active interest but divided faith in Topaz products. Several of us are wondering if you have a blog entry detailing your approach to hand-denoising? Is it more than using feathered selections in smooth, high-noise areas and applying just enough Gaussian blurring to remove the noise?
ReplyDeleteI have small sections in my books detailing my approach to de-noising, which is essentially "Move a couple of sliders". Scott Kelby covers this stuff to death and so there's no reason for me to reinvent the wheel. When I want low noise, I usually just opt for better light. (I know that sounds arrogant... but look at how far that approach has taken me!) GF
DeleteTopaz Denoise AI is quite handy; however, I've found Topaz Sharpen AI is very good, particularly the Stabilize and Focus options.
ReplyDeleteI also have the other two in Topaz's bundle but have used them very little.
Hi Gary.
ReplyDeleteI found your test with Topaz very interesting as i have tried some of the AI type programs and found your results similar to mine. For novice and amateur photographic enthusiasts these programs can help them to improve their images with out the technical skills required by some other programs.
Yes i could be interested in a virtual talk for our club.
We have no virus but no incoming visitors either.
Kind regards
John
Hi, John! Since you posted as "Anonymous" I have no good way to get in touch with you. Please send an email to Gary at Friedman Archive dot com to talk about a talk (for your club). Thanks! GF
DeleteI think Matt Kloskowski did a comparison of various sharpening and denoise apps compared to Lightroom some time ago.
ReplyDeleteHis main comment was that Adobe are continually doing tweaks of there sharpening and denoise areas all the time but do nt necessarily announce or comment on it - they just do it.
From what I remember his recommendation was stick with the LR panels and save money - and in some cases a bit of time the others can spend in rendering.
It's so easy to become obsessed with this stuff. I am waiting for the day when someone tells me, "Gee, that's a great picture, but it doesn't look like you used Photoshop to denoise it with". (And when that happens I'll be sure to point out that they shouldn't be ending sentences with prepositions. :-) )
DeleteI'm glad to see that sentences are not allowed to end in prepositions in your house either, Gary!
ReplyDeleteJust don't get me started about "one space or two after a period". :-)
DeleteHa! I've reformed from the days of typewriters. I understand the reliable placing of fonts in modern software diminishes the importance of the added space. Although, old habits don't go away without a fight.
DeleteTwo!! :-)
DeleteIt's a full stop, for a start, Gary ;)
DeleteSorry but your obersvations are VERY odd. For example, on the Dancers with fan photo, you claim Photoshop won by a LOT...are you NOT seeing the horrible artifacts the excesive noise reduction created in your Photoshop version???? You can do the same with Topaz if you like but, I am shocked to see that you do not notice such obvious thing. I would expecet some untrained person to be fooled by such heavy denoising but was expecting a LOT more from you.
ReplyDeleteRetouching is very often a subjective thing, which is why I presented the results for you to see so you could evaluate and make up your own mind. My interest was in the preservation of detail and not having plastic-looking faces which can happen with over-aggressive NR.
DeleteWhy pay for an average upscaler like Topaz's? Try these free software Upscales available on the web:
ReplyDelete1) ImgLarger
2) Lets Enhance
3) ImgUpscaler.
All of them easily beat Topaz and some are better than Photoshop CC's current best effort.
Gary, keep the beard. It works for you!
ReplyDeleteGary, I'm a fan (and purchaser) of your e-books, but can't agree with your conclusions concerning Topaz AI Clear or DeNoise.
ReplyDeleteFirst, the images you chose do not have the level of detail that would highlight the advantages of the Topaz programs.
In the student head shots, if you look at the sweaters, you can see much more detail than in the PS version and this also applies to hair in the "headache" photos.
Any photo that has finer detail instead of just swaths of color, such as animals, grasses, flowers, insects, even the crevices in mountains will make the advantage of the Topaz products apparent.
I don't dispute that you might be able to get the same results in PS, but it will take a lot more time fine tuning it to each photo.
Sharpen AI is a lifesaver for a memorable photo that has been ruined by motion blur. The PS version takes forever and I've never achieved similar results. P.S. I'm not associated in any way with Topaz.
Thanks for your insights, GWM!
DeleteDoes nobody else see the severe even/odd scan line alignment issue with the two upscaled videos?
ReplyDeleteI do, and I mentioned it in the writeup. It probably has something to do with de-interlacing. Haven't had time to pursue it. :-(
Delete